Automatically Merge Duplicate HubSpot Contacts (CRM)
(Free n8n Workflow + Video + Downloadable Guide)
This guide shows you how to automatically merge duplicate contacts in HubSpot using n8n—even on a free HubSpot plan. No need to upgrade to access paid features: this automation uses the HubSpot API to detect and merge duplicate contacts on its own.
You can copy and paste the ready-to-use workflow and launch it right away—no coding needed—to improve your CRM data quality in just a few minutes.
🎉 You're all set!
Your automation, guide, and video tutorial are on their way to your inbox!
👉 Check your inbox in a few minutes (and your spam folder, just in case…)

Trusted by Leading Professionals Across Industries


What the n8n Automation Does to Automatically Merge Duplicate Contacts in HubSpot
Want to merge duplicate contacts in HubSpot without paying for advanced features? This n8n automation is built to save you time by automatically handling contact merges via the HubSpot API.
Here’s how it works: follow the plug-and-play workflow, connect your HubSpot account, and with just a few clicks, automate the detection and merging of duplicate contacts in your CRM.
Bonus: you can easily customize this setup to filter specific types of duplicates or extend it to other CRM objects (companies, deals, etc.).
No more repetitive tasks or limitations of the free plan—with n8n, you can merge HubSpot contact duplicates simply, efficiently, and without extra costs!
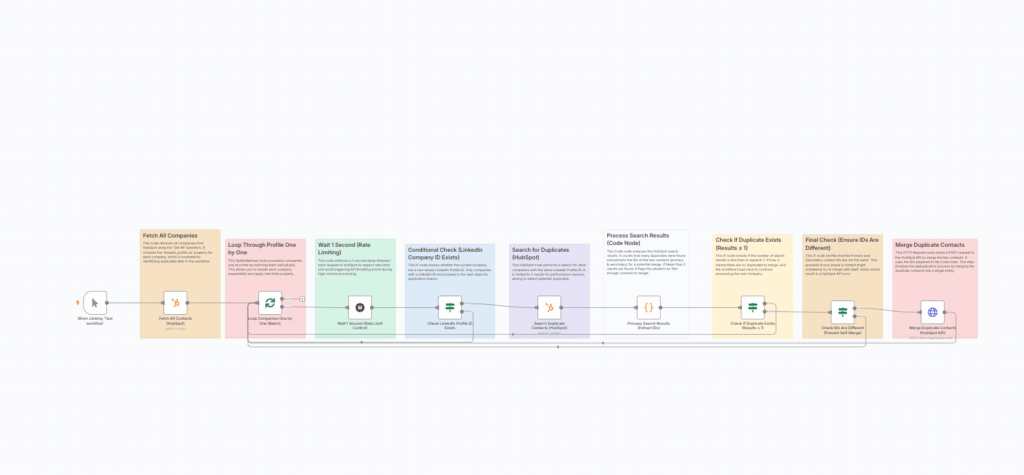
To make things easier for you, the workflow you’ll download is fully ready to use: every step of the scenario is explained, with built-in notes directly inside n8n. You’ll see exactly how each action works—everything is pre-mapped for you.
On top of the workflow, you’ll get a complete video guide and a step-by-step tutorial to walk you through setup and launch. It’s super simple: drag the scenario into your n8n, follow the instructions, and automate HubSpot contact deduplication in just a few minutes.
The goal: not just to automate HubSpot duplicate contact merging quickly, but to help you understand how it works and level up your skills with n8n workflows.
🎉 You're all set!
Your automation, guide, and video tutorial are on their way to your inbox!
👉 Check your inbox in a few minutes (and your spam folder, just in case…)
Video Tutorial – Merge Duplicate HubSpot Contacts with n8n
n8n Workflow Breakdown: Step-by-Step Guide with Screenshots (HubSpot Contact Merge)
Prerequisite: Define a Unique Criteria to Identify Duplicate Contacts in HubSpot
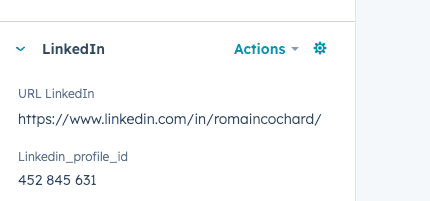
Before using this automation, it’s essential to define a unique identifier to detect duplicate contacts in HubSpot. By default, HubSpot identifies duplicates using the email address, but this method quickly falls short if your contacts use multiple emails or change their addresses.
To ensure accurate detection, it’s highly recommended to enrich your contact records with a shared unique ID. In our case, we use the contact’s LinkedIn ID (linkedin_profile_id), which is a reliable and unique identifier for each individual.
- Make sure each HubSpot contact has a LinkedIn Profile ID field filled in.
- If not already done, enrich your data by importing LinkedIn info via a third-party tool or this free downloadable workflow.
- The workflow you’ll download will automatically detect all contacts with the same LinkedIn Profile ID and merge them.
Important: this automation relies on a reliable shared field. If you’re not using LinkedIn, you can choose another unique identifier (e.g., phone number, internal ID, etc.) as long as it’s identical across duplicate records.
Step 1: Start the Workflow (Manual Trigger)
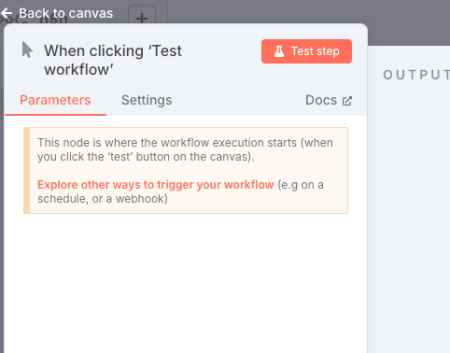
This first step lets you manually test the workflow. Using n8n’s Manual Trigger module, you can run the scenario on demand to verify that everything works before automating it in production.
The manual trigger is especially useful for testing each step in real-time and diagnosing any issues. Once your tests are validated, you can replace this trigger with an automated one (e.g., cron, webhook…) if needed.
➡️ Settings:
- Trigger type: Manual Trigger
- Use case: Launch the workflow manually via the n8n interface
To start: click “Execute Workflow” in n8n to begin the process.
Step 2: Retrieve All Contacts from HubSpot
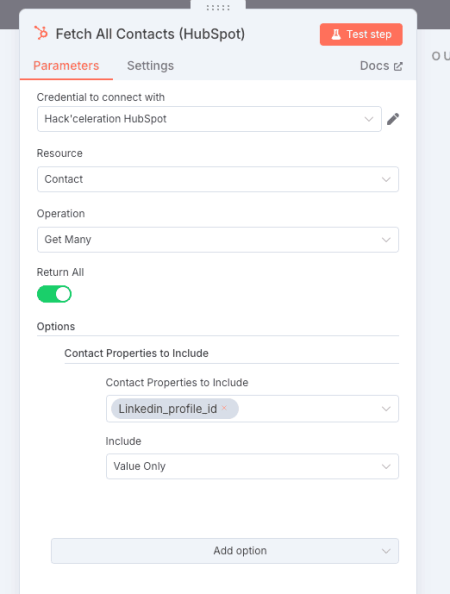
This step uses the HubSpot module to fetch all contacts stored in your CRM. The goal is to build a full dataset to analyze and detect duplicates based on your chosen unique identifier (e.g., LinkedIn Profile ID).
We use the Get All option to retrieve all records at once, allowing you to process every contact automatically without any specific limit.
➡️ Settings:
- Resource: Contact
- Operation: Get All
- Return All: Enabled (Yes)
- Retrieved properties: linkedin_profile_id (you can add more fields if needed)
This step allows you to centralize all contact records so they can be processed one by one in the next steps.
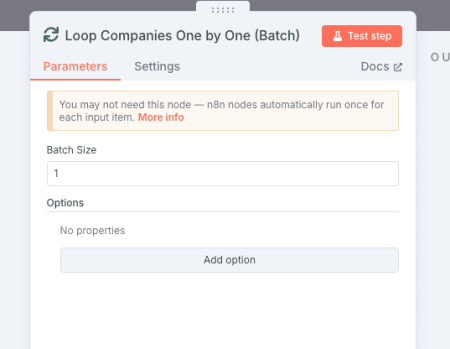
Step 3: Loop Through Each Contact (SplitInBatches)
This step uses the SplitInBatches module to process each contact one by one. It helps prevent API overload and gives you precise control over individual contact handling.
The batch is configured with a size of 1, meaning each workflow execution processes a single contact before moving on to the next.
➡️ Settings:
- Batch Size: 1
This setup ensures smooth and safe execution even when dealing with a large volume of contacts.
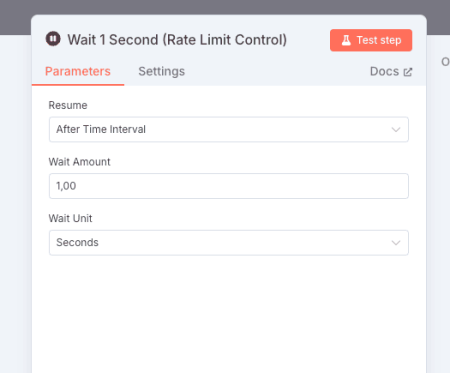
Step 4: Add a 1-Second Delay (Rate Limiting)
To avoid API overload and comply with HubSpot rate limits, this step uses a Wait module to insert a 1-second delay between each contact processing.
This step is essential if you’re handling a high volume of contacts—it prevents errors like “429 Too Many Requests” during consecutive HubSpot API calls.
➡️ Settings:
- Wait Time: 1 second
Thanks to this short pause, the workflow remains stable and API-compliant, even when running across hundreds or thousands of contacts.
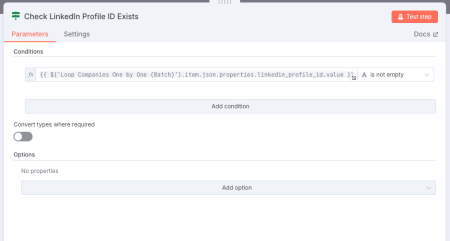
Step 5: Check for LinkedIn Profile ID
This step is crucial: it uses an IF module to verify whether the current contact has a LinkedIn Profile ID. This field is essential for accurately detecting duplicates.
If the contact doesn’t have this field filled in, the workflow skips it and moves to the next one, avoiding errors or unnecessary lookups.
➡️ Settings:
- Condition: {{$(‘Loop Contacts One by One’).item.json.properties.linkedin_profile_id.value}} is not empty
- Combinator: AND
This step helps secure the workflow by ensuring that only eligible contacts (those with a LinkedIn ID) are analyzed.
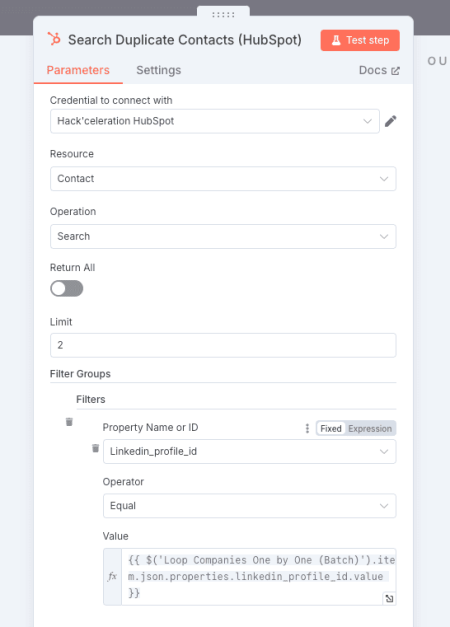
Step 6: Search for Contacts by LinkedIn Profile ID (HubSpot Search)
This step is essential: it identifies all duplicate contacts based on their LinkedIn Profile ID. To do this, we use the native HubSpot – Search module, which allows you to search contacts by a custom property.
Why this approach? Unlike company searches that require a custom API call, here we can use the native n8n module directly, as it supports searching contacts by custom property.
The module queries the HubSpot API using the internal endpoint and limits the results to 2, which is enough to confirm a duplicate.
➡️ Settings:
- Resource: Contact
- Operation: Search
- Limit: 2
- Filter Groups:
{
  "propertyName": "linkedin_profile_id|number",
  "value": "={{ $('Loop Contacts One by One').item.json.properties.linkedin_profile_id.value }}"
}
This query searches for all contacts whose LinkedIn Profile ID matches the one from the current contact being processed. The response includes the key data of the contact to be merged.
Why a limit of 2? This checks whether there are at least two contacts with the same LinkedIn Profile ID. If that’s the case, a duplicate is detected and the workflow proceeds to the next step to merge them.
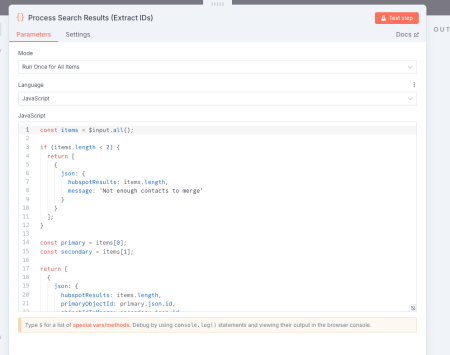
Step 7: Process Search Results (Extract Contact IDs)
This step uses a Code module to analyze the results returned by the HubSpot search. Its role is twofold: count the number of results and extract the IDs of the contacts to be merged.
The code checks whether at least 2 contacts were found. If so, it extracts:
- primaryObjectId: the ID of the first contact (to be kept after the merge)
- objectIdToMerge: the ID of the second contact (to be merged and removed)
➡️ Code used:
const items = $input.all();

if (items.length < 2) {
  return [
    {
      json: {
        hubspotResults: items.length,
        message: 'Not enough contacts to merge'
      }
    }
  ];
}

const primary = items[0];
const secondary = items[1];

return [
  {
    json: {
      hubspotResults: items.length,
      primaryObjectId: primary.json.id,
      objectIdToMerge: secondary.json.id
    }
  }
];
This code also adds a safeguard: if fewer than 2 contacts are found, it returns an info message stating that no merge will be performed in this cycle.
This step prepares all the necessary data for the final merge API call.
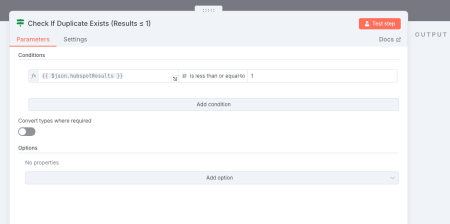
Step 8: Check If Duplicates Exist (Results ≤ 1)
This step uses an IF module to check the number of results found during the duplicate search. The goal is to confirm whether at least two contacts exist with the same LinkedIn Profile ID.
If the number of results is less than or equal to 1, it means no duplicate was detected, and the workflow automatically moves on to the next contact without attempting a merge.
➡️ Settings:
- Condition: {{$json.hubspotResults}} ≤ 1
- Case Sensitive: Yes
- Combinator: AND
This step helps avoid unnecessary API calls when the search results include only one contact (or none), ensuring better performance and improved reliability.
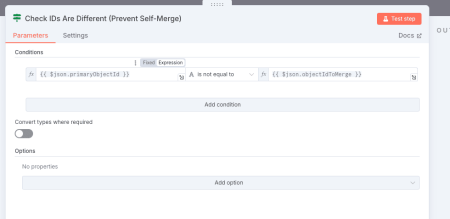
Step 9: Ensure IDs Are Different (Prevent Incorrect Merges)
This step uses an IF module to make sure that the two contacts to be merged have different IDs. This is a critical safeguard—HubSpot does not allow merging a contact with itself, and skipping this check could trigger an error.
This condition prevents unnecessary API errors by blocking the merge attempt if primaryObjectId and objectIdToMerge are the same.
➡️ Settings:
- Condition: {{$json.primaryObjectId}} ≠ {{$json.objectIdToMerge}}
- Case Sensitive: Yes
- Combinator: AND
This step helps fully secure the process before the final API call is made.
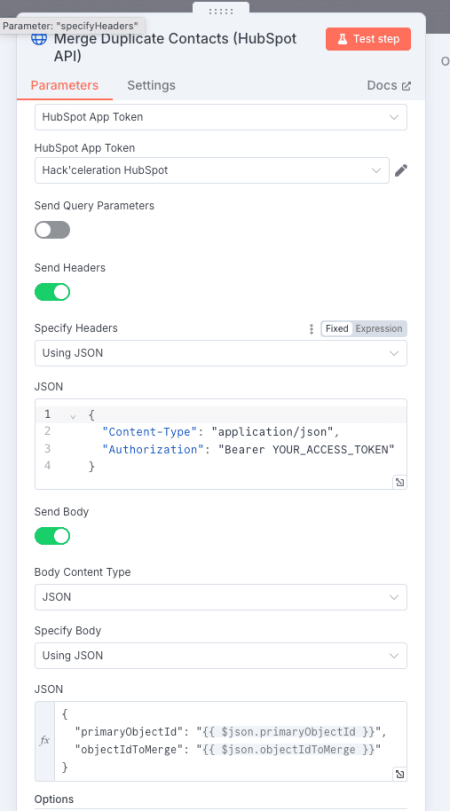
Step 10: Merge Duplicate Contacts (HubSpot API)
This final step uses an HTTP Request module to send a POST request to the HubSpot API in order to merge the two contacts identified as duplicates.
The API call uses the official endpoint: https://api.hubapi.com/crm/v3/objects/contacts/merge to perform the merge, authenticated via your HubSpot token.
➡️ Settings:
- Method: POST
- URL: https://api.hubapi.com/crm/v3/objects/contacts/merge
- Headers: Content-Type: application/json + Authorization: Bearer Token
- Body:
{
  "primaryObjectId": "{{ $json.primaryObjectId }}",
  "objectIdToMerge": "{{ $json.objectIdToMerge }}"
}
This request merges the secondary contact (objectIdToMerge) into the primary contact (primaryObjectId). HubSpot keeps the main data from the primary contact and archives the duplicate.
This step completes the automation—leaving your CRM clean, duplicate-free, and ready for use. If you need help implementing similar CRM automation workflows, our team can support your specific needs.
Why Removing Duplicate HubSpot Contacts Is Essential for Your CRM
Keeping a clean and well-organized HubSpot CRM is crucial to ensure data quality and maximize the efficiency of your sales and marketing teams. Duplicate contacts cause errors, skew reports, and make customer relationships harder to manage.
Problems caused by duplicates:
- Inaccurate or conflicting data in your pipelines.
- Risk of contacting the same client or lead multiple times.
- Less effective marketing campaigns due to segmentation errors.
- Wasted time for your teams manually checking and fixing records.
Benefits of automatically merging duplicates in HubSpot:
- Centralized key information for each contact.
- Better customer experience with accurate, up-to-date data.
- Automated repetitive tasks to boost productivity.
- Reliable reports and insights to guide your sales strategy.
By automating the merging of duplicate contacts in HubSpot, you ensure a high-performing CRM, save valuable time, and reduce the risk of human error. This automation is a powerful lever to improve your customer database management and accelerate your company’s growth. Looking for similar automation for companies? Check out our guide to merge duplicate companies in HubSpot.
🎉 You're all set!
Your automation, guide, and video tutorial are on their way to your inbox!
👉 Check your inbox in a few minutes (and your spam folder, just in case…)
