Track SEO Positions Google Search Console | n8n
Checking keyword positions manually is a productivity killer. You log into Search Console, set your date range, filter by query, export the data, paste it into a spreadsheet, and repeat the whole process for each keyword you’re tracking. By the time you’ve collected a week’s worth of data, you’ve wasted hours.
The full automation, in your inbox
Track SEO Positions Google Search Console | n8n

Track SEO Positions from Google Search Console to Google Sheets with n8n (Free n8n Workflow + Video + Tutorial + Download)
Requirements: n8n instance & API keys.
! You'll needRequirements: n8n instance & API keys.
- A self-hosted n8n instance with terminal access.
- API credentials for the services used in this workflow.
The full automation, in your inbox
n8n workflow breakdown.
01 Step 01Manual Trigger - Start the Workflow.
The workflow begins with a Manual Trigger node. This is your starting point—when you click "Execute Workflow" in n8n, everything kicks off from here.
For daily automated tracking, you'll want to replace this with a Schedule Trigger node set to run once per day. But during setup and testing, the manual trigger lets you run the workflow on-demand and verify each step works correctly.
💡 Tip: Once your workflow is tested and working, swap this for a Schedule Trigger set to run at 6 AM daily. This ensures you capture yesterday's complete Search Console data before it's finalized.
 Parameters
- Node Type: Manual Trigger
- Configuration: No parameters required—this node simply initiates workflow execution
- Output: Empty JSON object that triggers the next node
02 Step 02Google Sheets - Read Keyword and Country Configuration.
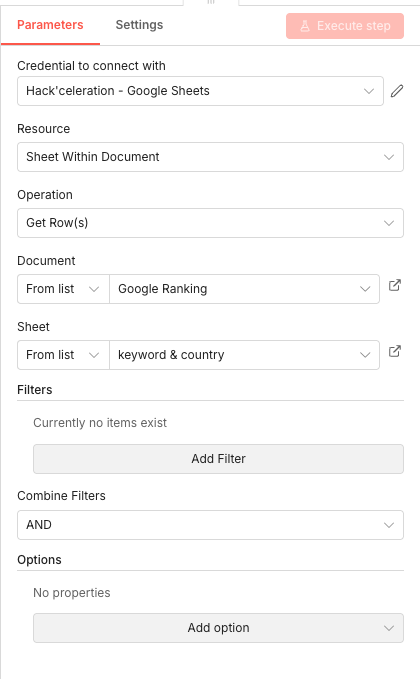
This node reads your tracking configuration from Google Sheets. It fetches the list of keywords you want to track along with their target countries.
Your configuration sheet should have columns for the keyword (exact match) and the country code (like "usa" or "fra"). Each row represents one keyword-country combination to track. This setup makes it easy to add or remove keywords without modifying the workflow.
💡 Tip: Structure your configuration sheet with clear headers like "keyword" and "country". The workflow will use these column names to reference values in later nodes.
 Parameters
- Credential to connect with: Hack'celeration - Google Sheets (OAuth credential selector)
- Resource:
Sheet Within Document - Operation:
Get Row(s) - Document: From list →
Google Ranking - Sheet: From list →
keyword & country - Filters: None applied—retrieves all rows
- Combine Filters: AND (default)
- Options: No additional options configured
03 Step 03Google Sheets - Read Date Range for Historical Tracking.
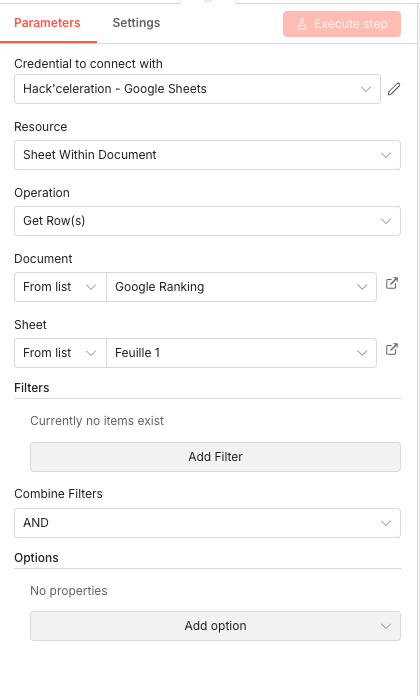
This second Google Sheets node reads the dates you want to fetch data for. By storing dates in your spreadsheet, you control exactly which historical period gets queried.
The sheet should contain a list of dates in a format that Google Search Console accepts (YYYY-MM-DD). You can pre-populate this with the last 30 days, or set it up to track specific date ranges for backfilling historical data.
💡 Tip: Google Search Console data has a 2-3 day delay. Don't include today's date or yesterday's date in your tracking—you'll get incomplete data. Start from 3 days ago.
 Parameters
- Credential to connect with: Hack'celeration - Google Sheets
- Resource:
Sheet Within Document - Operation:
Get Row(s) - Document: From list →
Google Ranking - Sheet: From list →
Feuille 1(or your dates sheet) - Filters: None applied
- Combine Filters: AND
- Options: No additional options
04 Step 04Split In Batches - Process One Date at a Time.
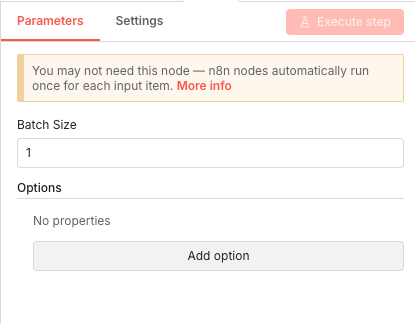
The Split In Batches node controls how the workflow processes your date list. Setting the batch size to 1 means each date is processed individually before moving to the next.
This is crucial for API rate limiting. Google Search Console has quotas, and processing one request at a time prevents you from hitting those limits. It also makes debugging easier—if something fails, you know exactly which date caused the issue.
💡 Tip: If you're backfilling a large date range (90+ days), consider adding a Wait node after each API call with a 1-second delay. This keeps you safely under Google's rate limits.
 Parameters
- Batch Size:
1(processes one date per iteration) - Options: No additional options configured
- Batch Size:
05 Step 05HTTP Request - Query Google Search Console API.
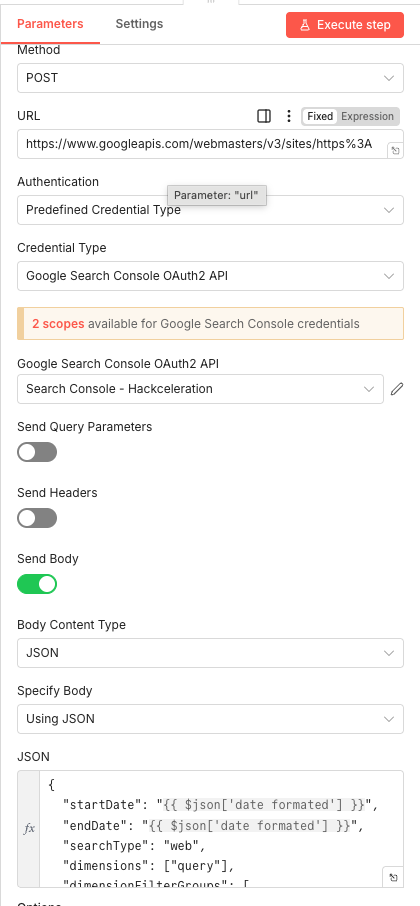
This is the core of the workflow—the HTTP Request node that queries the Google Search Console API. It sends a POST request with your keyword filters and date parameters, then receives position and impression data in return.
The API endpoint requires OAuth2 authentication and a JSON body specifying your query parameters. The body includes the date range (same start and end date for daily data), search type (web), dimensions (query), and filters for the specific keyword and country.
JSON Body Structure:
{
  "startDate": "{{ $json['date_formated'] }}",
  "endDate": "{{ $json['date_formated'] }}",
  "searchType": "web",
  "dimensions": ["query"],
  "dimensionFilterGroups": [{
    "filters": [
      {"dimension": "query", "expression": "{{ $json['keyword'] }}", "operator": "equals"},
      {"dimension": "country", "expression": "{{ $json['country'] }}", "operator": "equals"}
    ]
  }]
}
💡 Tip: The URL must be URL-encoded. For "https://example.com/", use "https%3A%2F%2Fexample.com%2F". You can find the exact format in your Search Console property settings.
 Parameters
- Method:
POST - URL:
https://www.googleapis.com/webmasters/v3/sites/https%3A%2F%2F[YOUR_DOMAIN]%2F/searchAnalytics/query - Authentication: Predefined Credential Type
- Credential Type: Google Search Console OAuth2 API
- Credential: Search Console - Hackceleration
- Send Body: ON
- Body Content Type: JSON
- Specify Body: Using JSON
- Method:
06 Step 06IF Node - Check if Position Data Exists.
Not every keyword has ranking data for every day. If your site didn't appear in search results for a particular query on a given date, the API returns an empty response. This IF node handles that scenario.
The condition checks whether the position field exists in the API response. If data exists, the workflow continues to update the spreadsheet. If no data exists, the workflow skips the update and moves to the next date—no errors, no wasted processing.
Branch Logic:
- True branch (position does not exist): Skip to next iteration
- False branch (position exists): Continue to update Google Sheets
💡 Tip: This error handling is essential for reliable automation. Without it, the workflow would fail whenever a keyword has no data for a specific date.
 Parameters
- Condition Expression:
{{ $json.rows[0].position }} - Operator:
does not exist - Convert types where required: ON (enabled)
- Options: No additional options configured
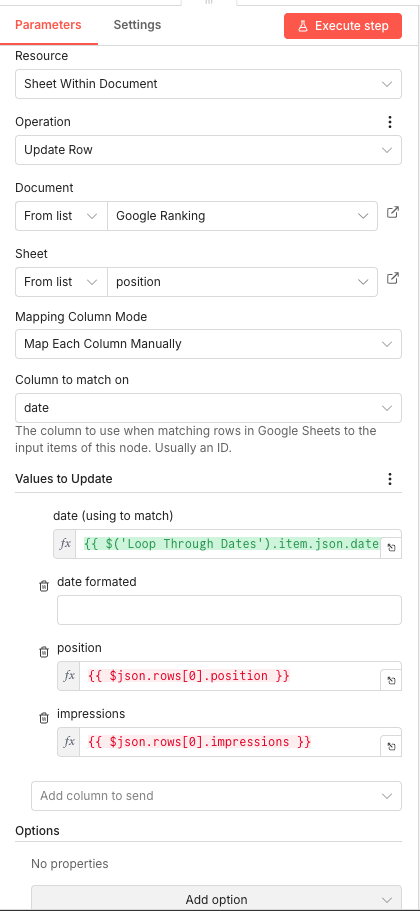
07 Step 07Google Sheets - Update Position and Impressions Data.
The final node writes the fetched position and impression data back to your tracking spreadsheet. It matches rows by date, so running the workflow multiple times for the same date updates existing data rather than creating duplicates.
The node maps specific columns: date, formatted date, position, and impressions. The position and impression values come directly from the Search Console API response, extracted using expressions that reference the JSON output.
Values to Update:
- date (matching column):
{{ $('Loop Through Dates').item.json.date }} - date_formatted: (leave blank or add formatted date expression)
- position:
{{ $json.rows[0].position }} - impressions:
{{ $json.rows[0].impressions }}
💡 Tip: Create your position tracking sheet with columns for: date, keyword, country, position, impressions, clicks. Pre-populate the date column with your tracking period so the Update Row operation has rows to match against.
Parameters- Resource:
Sheet Within Document - Operation:
Update Row - Document: From list →
Google Ranking - Sheet: From list →
position - Mapping Column Mode:
Map Each Column Manually - Column to match on:
date
- date (matching column):
Get the ready-to-import n8n JSON plus the install guide
Drop your email and we'll send you the complete scenario.
- n8n JSON ready to import
- Written setup guide
- Video tutorial included
Why Automating SEO Position Tracking is a Game-Changer for SEO Professionals
Keyword position tracking is the foundation of SEO measurement. You can't improve what you don't measure, and you can't prove ROI to clients without historical ranking data. But the manual approach to tracking creates serious problems. Common challenges with manual position tracking: Time-consuming daily exports from Google Search Console Inconsistent data collection (missed days, forgotten keywords) Limited historical depth without paid tools Data scattered across multiple spreadsheets and exports No standardized format for client reporting Benefits of automated position tracking: Consistent daily data collection without manual intervention Complete historical records that build over time Centralized data in a single, organized spreadsheet Easy chart creation and trend analysis Professional client reports generated from live data Zero ongoing cost compared to premium SEO tools For SEO consultants and agencies, automated tracking transforms how you demonstrate value to clients. Instead of screenshots and ad-hoc reports, you deliver data-driven insights backed by weeks or months of consistent tracking. Our n8n agency can help you implement similar automations. For in-house marketers, this workflow eliminates a tedious task and gives you more time for actual optimization work. The data is always there when you need it—for weekly reviews, monthly reports, or deep-dive analyses.
The full automation, in your inbox.
n8n JSON, written guide and video tutorial, everything to ship this in under 15 minutes.
- Complete n8n scenario JSON
- Step-by-step setup documentation
- Full video walkthrough